Set up a cross-compilation environment and use NetBeans to debug code running on a Raspberry Pi
2018-01-22
Previous article
Introduction
This is part two of my quest to build BlueTooth Low Energy Peripherals for fun. The first part showed how to create a rudimentary Peripheral on a Mac. But really, it was to learn about how it’s done on a Mac, and I don’t see much interest in turning your Mac into a Peripheral. Let me know otherwise!
This installment is in preparation to making a Pi a Peripheral. Here I describe how I set up a cross-platform development hosted on a Mac, targeting a Pi. This includes debugging using NetBeans.
Here goes:
The Pi is great, but, alas, it’s slow. Also, I configured mine to be headless, so no IDE for me while working on it. I used this little “hello world” project to set up my environment for cross compiling, running and debugging arbitrary code from my Mac on to the Pi.
The development workflow is:
- Use the Mac to write code. You don’t have to use NetBeans as the IDE, although I suggest you do, since we will be using it to debug on the target.
- Use the makefile to transfer the binary to the pi.
- Use NetBeans to debug the code running on the Pi (remotely)
Cross compiling
It took me a long time to find a cross compiler. Most of the Googles came back with set up from Linux, and required a VM to connect to. This, of course, is an overkill, and I opted for the solution presented here. Thank you Jared Wolff!
I used Jared’s DMG that he created, and since I am running my Mac case-insensitive, I could not copy the toochain locally, and quickly got used to referencing the cross-compiler toolchain off a mounted volume.
Using the command line, it looks like this:
/Volumes/xtools/armv8-rpi3-linux-gnueabihf/bin/armv8-rpi3-linux-gnueabihf-g++ welcome.cc
To test that it works, scp it to your Pi and run it there.
Setting up NetBeans
NetBeans is the only IDE that I could get to configure for cross-platform development. XCode is a horror to work with when it comes to general, non-iOS or Mac development. CLion is awesome, but does not lend itself to such configurations and is based on CMAKE, which is an overkill for my needs. So NetBeans it is:
Create your project, or use the one in github.
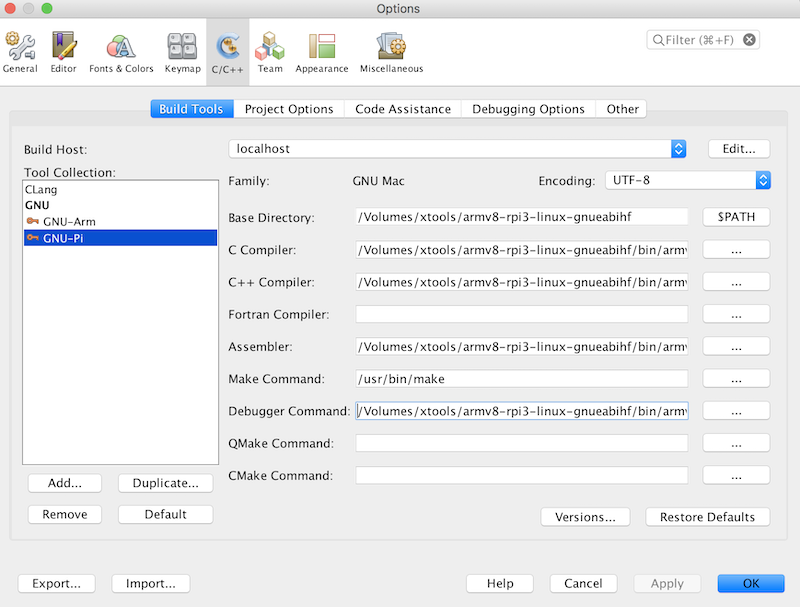
Select preferences (Command+,), select the “C/C++” tab at the top of the pane.
There, click on the “Build tools” tab and hit click on “Add” at the bottom.
Fill in the pane like so:

Beware The Gotcha
As you can see, NetBeans asks for the “Base Directory”. I thought that supplying the tool names would suffice, based on the base dir. For me at least, this did not work and Make complained about finding the tools. To solve it, I put the full path of the tools in the dialog and added them again in the project’s properties page. If you encounter the same problem, right click the project’s root and select “properties”. There, select “Build” and then “C Compiler” etc to add in the full paths:

Running on a Pi
Once you have some code worthy of being run on the Pi, you transfer the executable to it and run it remotely:
echo "Copying file"
scp "dist/Debug/GNU-Pi-MacOSX/welcome_1" pi@pi:~
echo "Running file"
ssh pi@pi -C "./welcome_1"
Remote debugging using NetBeans
Step-debugging the code in NetBeans is a treat.
Running the debugger on the Pi
Run the remote debugger:
gdbserver :1234 welcome_1
Here you’re telling gdbserer to run the welcome app on port 1234.
In NetBeans
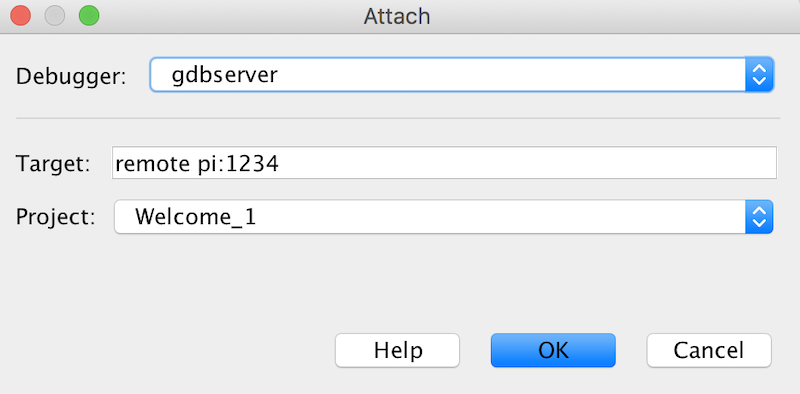
From the menu, select “Debug”/”Attach debugger” and fill in the form:
- For debugger, select “remote debugger”
- For target, type “remote pi :1234”
‘pi’ is the pi’s host name (I put mine in /etc/hosts)
‘:1234’ is the port with which NetBeans will communicate on your Pi. This has to be the same port number that you selected in the
gdbservercommand above.

Hit OK, and a few seconds later, you will see NetBeans’s debugger interface. Step through the example to see it in action.

Beware The Gotcha
Unless specified otherwise, gdbdebugger will exit after a single run. That means you’ll have to re-issue the gdbserver command for a subsequent session.
Access the example
Please feel free to use, fork and improve this snippet, posted on github.
I hope you find the example useful!
Happy hacking!
Previous article
Filed under
Cross-compile
GNU
Mac OS X
- Bluetooth Low Energy (BLE) Implementing a peripheral on Mac OS X
- Drobo will not mount in Finder
- Quickie - ssh dynamic port forwarding to avoid unsecured public networks
- Remote compilation, execution and debugging Raspberry Pi from a Mac using NetBeans
- Weekend warrior - MacRuby and rSpec, Mac OS X Lion, Xcode V4.3.2
NetBeans
Raspberry Pi
Remote debugging
Other Tags
API GW
AWS
- Programming ESP32 using MQTT with AWS and FreeRTOS
- Quick AWS IoT Setup and test
- Set up AWS API GW with a Typescript authorizer and logging
- Use AWS CodePipline to execute CloudFormation templates
- Use GitHub Actions to deploy your SPA hosted on Amazon S3
- Use an AWS CloudFormation script to create and host an SPA on S3 with SSL and apex/subdomain redirection using CloudFront
- Writing an Alexa skill using Ruby and AWS Lambda (Part 0)
ActiveRecord
Agile
- A review of software development metrics
- Agile programme management brief
- An alternative to current product development metrics
- An alternative to the current product development governance model
- Command & Control Management - The Party Killer
- Document Driven Development
- Inceptions revisited
- Managing multiple stakeholders
- Returns Driven Development
- The tip of the (good) iceberg
Alexa
Analysis
Ansible
BDD
BLE
C
CAB
CloudFormation
- Set up AWS API GW with a Typescript authorizer and logging
- Use AWS CodePipline to execute CloudFormation templates
- Use GitHub Actions to deploy your SPA hosted on Amazon S3
- Use an AWS CloudFormation script to create and host an SPA on S3 with SSL and apex/subdomain redirection using CloudFront
- Writing an Alexa skill using Ruby and AWS Lambda (Part 0)
CloudFront
CloudWatch
Cross-compile
Cucumber
DevOps
Devops
DotNet
Embedded
Fitbit
GNU
GitHub Actions
Governance
How-to
Inception
IoT
Javascript
Jest
Lambda
Mac OS X
- Bluetooth Low Energy (BLE) Implementing a peripheral on Mac OS X
- Cross-compiling for Raspberry Pi on a Mac and debugging using NetBeans
- Drobo will not mount in Finder
- Quickie - ssh dynamic port forwarding to avoid unsecured public networks
- Remote compilation, execution and debugging Raspberry Pi from a Mac using NetBeans
- Weekend warrior - MacRuby and rSpec, Mac OS X Lion, Xcode V4.3.2
MacRuby
Metrics
MySQL
NetBeans
Objective-C
PMO
Product Management
- A path to accelerating value realization
- A review of software development metrics
- Agile programme management brief
- An alternative to current product development metrics
- An alternative to the current product development governance model
- Express initiative kickoff formula
- Inceptions revisited
- Managing multiple stakeholders
- Plan for value delivery
- Pre-prod activity - Futurespective
- Value Stream Mapping
- When planning, it's not only about relative complexity
Programme management
Project Management
- A path to accelerating value realization
- A review of software development metrics
- Agile programme management brief
- An alternative to current product development metrics
- An alternative to the current product development governance model
- Command & Control Management - The Party Killer
- Express initiative kickoff formula
- Inceptions revisited
- Managing multiple stakeholders
- Plan for value delivery
- Pre-prod activity - Futurespective
- Value Stream Mapping
- When planning, it's not only about relative complexity
Quality Assurance
Rails
Raspberry Pi
Remote compilation
Remote debugging
Remote execution
Risk Assessment
Route 53
Ruby
- Alexa on Rails - how to develop and test Alexa skills using Rails
- Arduino programming using Ruby, Cucumber & rSpec
- How to reconnect to a database when its connection was lost
- Oh, the places you'll go...
- Quick AWS IoT Setup and test
- Weekend warrior - MacRuby and rSpec, Mac OS X Lion, Xcode V4.3.2
- Writing an Alexa skill using Ruby and AWS Lambda (Part 0)